Monday, 17 June 2013

Remember why you started


When I was 20 I picked up a cross stitch kit to pass the time while my then boyfriend played cricket on a Saturday afternoon. I really enjoyed it and bought another one and then another. Cross stitching passed the time and rekindled the love for being creative that i subdued in school because I assumed that if you couldn't draw then you weren't artistic.
A few years down the line I started designing my own patterns with a computer program. Nothing huge but i was please with the result. My most prized pattern at that time was one I designed for my Share sisters. Share was a site that helped me after the loss of my 3rd son Adam. At this point I had two sons (Evan & Adam)who had passed away during pregnancy and one healthy three year old called George. I went on to lose another little boy Ryan. Then we were blessed to have Daniel. I carried on designing patterns.
This is one I made for a friend. I have yet to stitch one for my three Angels.
Then came the sewing machine, I used an old one to try and make a camel costume for George when he got a part in the school nativity when he was four. It wasn't very good and I didn't manage to do the head but I was still proud I managed to make something without a pattern. It even had a little hump lol.
I started my facebook page to raise money to pay for a headstone for my boys and I managed to do that. By this time I had tried many different crafts and was really enjoying making and learning. The bonus came when I got to help pay the bills and buy some treats for the family. I work many more hours than when i used to "go out" to work but I love what I do and if I need to I can drop everything and go get the children or whatever needs to be done. 
So now i come to the point of the post. This weekend my children were both ill so there was no working at the machine. They needed me at the drop of a hat. I was so grateful that this was possible due to me working for myself. I have a four year old and an 13 year old but both of them needed their Mummy to look after them and give the cwtches. I didn't have to rely on someone else doing this for me.
While they were sleeping I picked up a crochet hook and logged on to you tube to do something I have been wanting to have a go at for a long time. I made a little flower first and was really pleased so i looked at other tutorials. Slowly between looking after each child and making dinner for my husband and father I made the butterfly in the top photo. Its not huge, it took me a few hours but I was so pleased with it. 
While everyone slept I sat downstairs and thought to myself that although the reason I ended up crafting something for myself wasn't the best I loved learning and having something to show for it.
From now on I am going to make sure that the only crafting I do on a Sunday will be something for myself and my family. The thrill of knowing people want to buy your creations is wonderful but remember why you picked up the needles, the hook or whatever you use in your craft and make something for yourself.
Happy Crafting.

Sunday, 31 March 2013

Win a forever memory panel of your child's drawing.


Forever Memory Raffle
I have really enjoyed doing these and thought as a way of saying thank you to all my followers on my facebook page I would run a raffle. The idea started when i saw my four year old draw a family picture of us for the first time ever. I wanted to put it up on the wall but then i noticed that the old ones that my 13 year old son had drawn as much as 7 years ago (yes I still kept them up) were starting to fade.
Wanting to keep them forever i decided to spend a few days over the Christmas holidays doing some freehand machine embroidery. I have no had a few commissions and have really enjoyed making them.
Places are now being booked as far ahead as Christmas.

I know they are quite a luxury item price wise so i wanted to give people a chance to win one.
So how will I do this? I have asked a few people and doing it on facebook was a risk I didn't want to take having worked on my page for quite a few years.

Now for the boring bit, terms and conditions.
1. This raffle is not supported or endorsed by facebook or any other 2nd party.
2. You may purchase as many tickets as you would like.
3. Ticket numbers will be allocated on the time stated my paypal account.
4. Tickets will cost £1 each, paid by sending gift payment lane.mummy2angels@ntlworld.com. Please put contact details in the notes so i can let you know if you have won.
5. Post and packaging is free anywhere in the UK however any overseas winners will incur additional postage costs.
6. Willowlane Designs reserves the right to ask for an alternative drawing and can not be held accountable for differences in the final product if a poor copy of the drawing is sent.
7. Raffle will be drawn during my Market Night on the 14th of April at 8.45pm. If more than 40 tickets are sold I will add another prize.
8. Winner will have the option to have panel made into a cushion cover.


Wednesday, 16 January 2013

To dye for?


Now I know this isn't really a craft post but it has had me thinking for some time now.
For those of us out there who dye are hair, why do we dye it?
At the grand age of 37 (until May) I have been dying my hair for over 20 years. It started because i wanted something a bit more exciting then brown. Now it has become a must to cover the white hair that is taking over my head. Just before Christmas was the last time i hide the truth but I am either using the wrong dye or my hair is fighting me because with in weeks the colour fades and the dye seems to come away from the white hair.
So I got to thinking what I would look like if I just grew it out and faced up to the fact that I will be a white hairs lady before i thought. Right now it looks about 60/40 or 70/30 if I want to be kind.
Should I keep spending all this money trying to stop time or should I just jump in and see what it looks like. I can always dye it if i don't like it right?
My plan is to have a hair cut so that i cut lots of the old dyed hair out and that it hopefully doesn't look so bad as I am growing it out. I tried stripping the dye off but it just turned my hair Ginger, not that I don't like ginger, in fact i spent years trying to get that colour if I had only know all I needed was a box of colour stripper I would have saved a fortune.
Would you do it if you were me? Does anyone want to join me? Would anyone like to see pictures as I go along? or should i just go get some dye and wait a few more years?

Wednesday, 28 November 2012

Fabric "paper chains"

When I was a child I used to love making paper chains. I wouldn't just link coloured papers i would also colour in my own designs. So when i was looking at some scrap fabric a few weeks ago the two merged into one in my head.
I made mine and I love it. I am looking forward to putting it up. For me to make it for someone else might be just too expensive so i thought why not share how i did it because it really was fun to make and it looks great.
Please forgive some of the photos my camera was on its last legs. I now have a new one.
Some of the fabrics i used have been in my stash for a while, the red fabric, the reindeer fabric and the bauble fabric were given to me by Rhi @ The sewing boutique you can order it from her if you wish to use it in your chains.


Step 1
Decide on your fabrics. It really doesn't matter what you use as long as you like it. I would say about 10 to 12 inches long and about 3 to 4 inches wide for each piece. I then iron on fusible interfacing to give them a little more stability.
Step 2
If you have the fabric in large pieces you now need to cut them to size, fold them in half with the right sides facing and pin. Sew up one short end and the long open end.
Step 3
Once you have sewn the all the strips, turn them all the right side out and the fold in the raw edge. Iron all of the strips. 
Step 4
You now need to make the first link for the chain. I like to sew a small square box on mine to make sure that the link is strong. If you wish to then add a small cross from corner to corner of the square. 


Step 5
Take another strip and feed it through the first link before you sew it into a new link. Repeat this step until you have used all the strips. You can make the chain as long as you like. When you have the chain the length you want tie a length of ribbon to each end to allow you to hang the chain from the ceiling.

The end result looks fantastic and will brighten the home for the festive season for years to come. The best part is you can add to it each year.

Wednesday, 4 July 2012

50 shades of crafting.

Where does time go. If you are waiting for something to happen it seems to drag, however if you need to do something or make a decision to be a regular at something time seems to slip away before you know it.
I always intend to practice my section of the songs I sing with a group I sing with at home Mello'D'. Then before i know it Thursday is here and I have to go to singing practice and the tape recorder hasn't moved from my bag.
Then there is my Zumba dvd that hasn't seen the dvd player for months, its a good job i get to class at least once a week.
Lastly (for now) there is the up keep of blog posts, i promise to do smaller posts more often. Yet here i am with a long post planned to let you know what's been happening at the table of Willowlane Designs.

First of all one of my favourite things was the next design team pack from The Sewing Boutique. I opening up my pack to find a FQ of their new fabric. Michael Miller's Mod Blooms and some lovely turquoise spotty ribbon. this Fabric called out for me to make something to wear. The first thing that sprung to mind was my friends little 3 month old baby girl Maddison. I had some polycotton that would go really well with this. The plan was to put some ribbon bows onto the skirt too but as i know my friend doesn't like things too "faffy" as we both say I decided not to add them. This just means I have what's left of the fabric and the ribbon left to make something for me. So here is the finished product, i like it that much i might start making them to order on my page Willowlane Designs Facebook Page.

I also organise craft fairs around my local areas and in June I was at a new venue for the Blaenavon World Heritage Festival. It was one of my biggest event yet and was a very busy and eventful day, best of all I made some sales. For this event i took some of my new thank you teacher cuts which seemed to go down really well with one not returning home with me and an order for two more.


Then finally for the last part of my makes for this blog. It seems to be selling like hotcakes in the UK and i am currently enjoying the 2nd book. You have more than likely guessed it already but the books in question are "Fifty Shades of Grey"
With this in mind i set about making some items for my page. When i find the time i will be making a t-shirt for myself too :-) All available to order, there is even a maternity range too.


So those were some of the things that were keeping me busy this past few weeks I hope you liked them. 
Until next time. 
Laters, Baby
Lane


Tuesday, 19 June 2012

Latest makes and other things.

The sun is finally starting to win the battle over the rain and it make such a difference to everything. Not heating, no lights and best of all washing outside on the line.
The sun also lifts my mood which is good as i think i may have been in a slump for a while. Last week i decided that enough was enough and the excuses had to stop, the reason i wasn't losing weight was down to only one thing, ME and the fact i was putting more in then i was working off. I have decided that there is to be NO snacking between meals and no biscuits, sweets or chocolate at all. This resulting in a slightly grumpy me while i get used to less food but also a 2lb weight loss on weigh in day. This week is the hardest one i think because i always seem to do well first week and not the 2nd. Plus i have to weigh a day early due to seeing Bruce Springsteen the day before weigh in and being in a different city.

So now down to the crafting. I have made a few things since the last entry and got a few orders in my book which i like. Working for yourself is sometimes strange. Of course its about the money but i think when you make things its also about people liking what you do.
I finished Miss Colette and i am very happy with her. She will be going on a long journey next month all the way to America.
She has a dress to change into and of course some knickers. Her little boots also come off.

I did a craft fair that i didn't organise for the first time in a while, it was good to sit there and relax. The time went so quickly. I learnt i need to plan my table more and have since bought a few items to aid my display.
I made up lots of peg magnets and a few oilcloth bag charms/keyrings.
 I will be getting a board for my work area i think so i can organise my to do list. I am a list writer for just about anything. So some of these will do just nicely.


These little bag charms I really enjoyed making these. They were a little challenging on the machine, i think i have an idea on how to stop them sticking, when i make the next batch. This is my first step into working with oilcloth and i am hoping to make some bags with some material that i bought ages ago.


I have had a little go at a new item this week too, while out shopping for supplies to help the look of my stall I found some really nice plates. There was two of one type and one of another but i thought they would look lovely as a cake stand. So off to the charity shop i went and found the perfect glasses. Its the first time i have had a go at this sort of thing but i have to say i am really pleased with the way it turned out, the best part is someone else liked it too so it has been sold.
Its one of the odd things that you buy the items to make and then sell on but a little part of you wants to keep everything. Of course this can't happen unless i buy a bigger house so i better get back to the sewing machine.
Until next time xoxo


Friday, 1 June 2012

My first sewing boutique pack

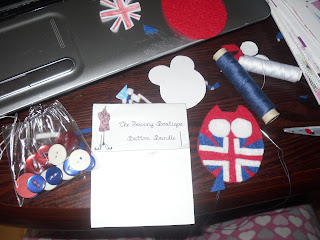
As you know i was chosen to be on the design team for The Sewing Boutique. I got my pack on the 19th of May. I was so excited about the challenge i ripped it open right away I then forgot to take photos of it all when i sat down to create something so i will have to tell you what i had.
The theme was jubilee colours so there were 3 sheets of lovely thick felt, a button pack, some blue gingham bows and a Union Flag button.
I sat down at my work table with a pencil and some paper and had a think about what to do.
The day before i had been to a craft show in Cardiff where Rhi from the boutique just happened to have a stall and i bought some keyring hoops so i though about making a keyring. I am a lover of them and have more keyrings than keys on my fob.
Now i am not the best drawer but like to have a little visual sometimes so i cam up with a few sketches to work from. These are my little drawings.


Owls seem quite popular at the moment so i thought i could mix the two.
I didn't realise how fiddly actually sewing on the flag bits would be but i am happy with how things turned out. The heart was just as tricky with the little bits but now i have some templates i may make other versions.

 I thought i better try and take a photos so you could see how lovely the packaging is and the items i got. As you can see i also had to sew bits on and cut off at the ends to make sure i had it just right.

This finished designs aren't too far away from my drawings so i was really happy with them.
I haven't quite decided if i will make more of these as they took about an hour each to make but i might offer them to order on my page Willowlane Designs for £7 plus p&p.


The next to come was the mini bunting. I thought it would look cute in the back of my car. I needed a few more bows to finish this off so i made them myself with some ribbon. I am rather proud they don't look too different from the ones in the pack.
This is now hanging in my car and i love it. I haven't seen anything like it and am going to expand on the idea some more. If you would like to order one of these with a name on or just as you see it please use the link above to my facebook page.
So these are the makes from my first Design Team Pack. I really enjoyed it and can't wait to get going on the next one. It made me think about other items i haven't made before and i think i even got a new product out of it :-) Thanks Rhi and here's to the next one.